

Mastering the Skies: Understanding the 3 Axes of Flight.
For a student pilot, the first few hours in the cockpit can feel like a sensory overload. Between the radio chatter and the engine noise, you’re trying to figure out why moving the yoke left makes the world tilt.
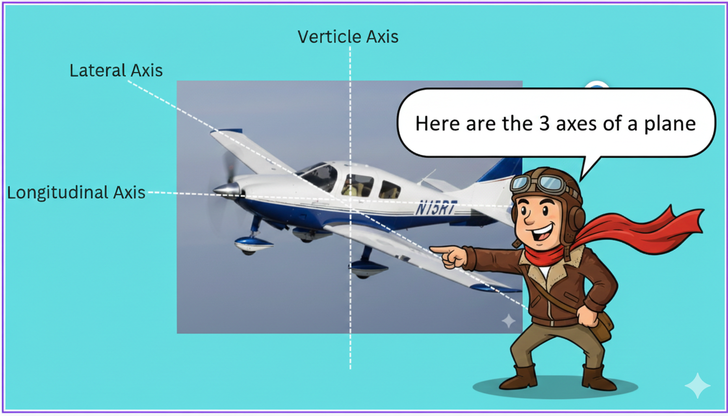
To master the airplane, you have to understand that it doesn't just move up, down, left, and right. It moves through a three-dimensional grid. We call these the Three Axes of Flight. Every movement the airplane makes happens by rotating around one (or more) of these imaginary lines, all of which pass through the aircraft's Center of Gravity (CG).
1. The Lateral Axis: Pitching Up and Down
Imagine a giant rod passing through the airplane from wingtip to wingtip. This is the Lateral Axis.
-
The Movement: Pitch.
-
The Control Surface: Elevators (located on the horizontal stabilizer).
-
The Pilot Action: You control pitch by pushing or pulling the yoke (or stick).
-
Pulling back deflects the elevator upward. This changes the airflow, pushing the tail down and forcing the nose up.
-
Pushing forward deflects the elevator downward, pushing the tail up and the nose down.
-
CFI Tip: Think of the elevator as a "teeter-totter." When you push one end down, the other must go up.
The CFI Anecdote:
"Pitch is the one that gets people’s heart rates up, especially on takeoff. Students love to 'yank' the nose up as soon as they see the airspeed hit 60 knots. I remember one student who pulled back so hard the stall horn chirped before we were even twenty feet off the ground. I had to take the controls and level us out. I told him afterward: 'The lateral axis is a balance beam, and the center of gravity is the pivot. If you treat the elevator like a light switch—on or off—you’re going to have a very short flying career. You don't pull the nose up; you invite it to rise.'"
2. The Longitudinal Axis: Rolling Side to Side
The Longitudinal Axis runs from the tip of the nose to the tip of the tail, right down the center of the fuselage.
-
The Movement: Roll (or Bank).
-
The Control Surface: Ailerons (located on the outer trailing edge of the wings).
-
The Pilot Action: You control roll by turning the yoke left or right.
-
Turning left raises the left aileron and lowers the right. The left wing loses lift, the right wing gains lift, and the plane rolls to the left.
-
-
The "Why": Because the ailerons move in opposite directions, they create an imbalance of lift, which is what actually rotates the plane around that center line.
The CFI Anecdote:
"I had a student, big guy, former linebacker. He used to grab the yoke like he was trying to wrestle a steer. In his first few lessons, every time he wanted to turn, he’d yank the yoke to the side and the plane would jerk. I told him, 'Stop fighting the plane. Imagine there’s a raw egg between your palm and the yoke.' I made him fly with just two fingers. I explained that the longitudinal axis is like a tightrope. You don't 'throw' the plane over; you nudge the air over the wings. Once he learned that 'Roll' is about pressure, not movement, his turns went from 'rollercoaster' to 'limousine' overnight."
3. The Vertical Axis: Yawing Left and Right
The Vertical Axis passes straight down through the center of the cabin, from the roof to the floor.
-
The Movement: Yaw.
-
The Control Surface: Rudder (located on the vertical stabilizer/fin).
-
The Pilot Action: You control yaw using the rudder pedals.
-
Pressing the right pedal moves the rudder to the right. The wind hits the rudder, pushing the tail to the left and the nose to the right.
-
CFI Tip: Many students mistake yaw for "steering" like a car. In the air, the rudder isn't for turning the plane—it’s for coordinating the turn. It keeps the nose pointed exactly where the plane is going, preventing "slips" or "skids."
The CFI Anecdote:
"The hardest thing to teach a 'driver' is that they have feet. Most students let their feet go 'dead' on the floorboards as soon as they leave the ground. I was flying with a guy during a crosswind landing, and we were drifting sideways over the runway like a crab. He was working the yoke frantically, but the nose was pointing ten degrees off the centerline. I shouted, 'Dance with it!' He looked at me confused, and I kicked the rudder to straightened us out. I told him: 'The vertical axis is the rudder's job. If you don't use your feet, you’re just a passenger in a very expensive kite. You don't just fly an airplane; you wear it.'"
Why Coordination Matters (The "Secret Sauce")
In a 6-minute ground lesson, we have to talk about how these axes work together. Rarely do you move an airplane around just one axis.
When you turn, you are using the Longitudinal Axis to bank. However, due to something called Adverse Yaw, the plane’s nose will want to swing away from the turn. This is where you use the Vertical Axis (rudder) to keep the flight coordinated. Finally, as you bank, you lose a bit of vertical lift, so you must use the Lateral Axis (pitch) to keep the nose from dropping.
For a student pilot, the first few hours in the cockpit can feel like a sensory overload. Between the radio chatter and the engine noise, you’re trying to figure out why moving the yoke left makes the world tilt.
To master the airplane, you have to understand that it doesn't just move up, down, left, and right. It moves through a three-dimensional grid. We call these the Three Axes of Flight. Every movement the airplane makes happens by rotating around one (or more) of these imaginary lines, all of which pass through the aircraft's Center of Gravity (CG).
Summary Table for Quick Reference
| Axis | Movement | Control Surface | Pilot Input |
| Lateral | Pitch | Elevator | Yoke (Fore/Aft) |
| Longitudinal | Roll | Ailerons | Yoke (Left/Right) |
| Vertical | Yaw | Rudder | Rudder Pedals |
Conclusion:
Understanding these axes is the "grammar" of flying. Once you stop thinking about "moving the stick" and start thinking about "rotating the aircraft around its center of gravity," your maneuvers will become significantly smoother. Next time we’re in the practice area, try to visualize these three rods passing through the plane as you fly!
The "Golden Rule" of the Three Axes
In a Cessna 172, these axes are never truly independent. When you roll (longitudinal), you often get "adverse yaw" (vertical), which requires rudder to stay coordinated. Mastering the sky isn't about learning one axis at a time; it's about learning how they all "sing" together.
Adverse yaw is often the "ah-ha!" moment for a student pilot. It’s the point where you stop being a "driver" and start being a "flyer." To understand it, you have to realize that the wings aren't always playing on the same team.
The Physics: Lift Comes with a Price
When you turn the yoke to the left, the right aileron goes down and the left aileron goes up. The right wing now has more "camber," so it creates more lift to pushed that wing up. But there’s a catch: Lift always creates Induced Drag.
Because the right wing is creating more lift to start the roll, it’s also creating more drag. That drag acts like a ghost grabbing onto your wingtip and pulling it backward. So, even though you want to go left, the nose of the plane actually swings to the right.
The CFI Anecdote: "The Lazy Ball"
"I had a student who was a natural at 'stick and rudder'—or so he thought. He could roll into a 30-degree bank perfectly, but he never touched the pedals. I told him to look at the Inclinometer (the 'ball' in the turn coordinator). Every time he turned left, that little black ball would slide out to the left, telling him the tail was fishtailing.
I told him: 'Imagine there’s a string connecting your hand to your foot. If your left hand moves the yoke left, your left big toe better be pushing that rudder pedal at the exact same time.'
To prove the point, I had him do 'S-turns' across a road without using his feet. The nose was hunting back and forth like a dog on a scent, never actually pointing where we were going. I looked at him and said, 'You see that? That’s the plane complaining. It wants to be coordinated. Don't make the airplane fight itself.'"
Why It Matters (The "Seat of the Pants")
If you don’t compensate for adverse yaw with your rudder, you’re flying uncoordinated. Not only is it inefficient (you’re dragging the side of the fuselage through the air), but it’s also uncomfortable.
The CFI Wisdom:
"I tell my students that their 'butt' is the best flight instrument in the cockpit. If you feel yourself sliding toward the side of the seat during a turn, you're uncoordinated. You 'step on the ball' to fix it. If the ball is to the left, step on the left rudder. Eventually, you stop looking at the instrument altogether. You just feel the yaw in your lower back, and your feet react before your brain even processes the physics."
Differential Ailerons: The Engineers' Solution
In a Cessna 172, the engineers actually tried to help us out. The ailerons are designed to be differential—the one going up moves a greater distance than the one going down. This creates extra "parasite drag" on the inside wing to help counteract that "induced drag" on the outside wing.
The CFI Take:
"Even with the fancy engineering, the plane still needs a pilot. The rudder is there for a reason. If you rely on the differential ailerons to do the work, you’re letting the engineers fly the plane. And trust me, the engineers aren't there to help you when you're slipping on a base-to-final turn!"
This is arguably the most important lesson in any pilot's primary training. In the flight instruction world, we call the Base-to-Final turn the "Deadly Turn" because it’s where a lack of understanding about coordination and stall speeds can lead to a tragic outcome.
The Setup: The "Overshoot"
Imagine you are flying the "Base leg" of your landing pattern. You have a tailwind pushing you toward the runway. As you start your turn to "Final" (aligning with the runway), you realize the wind has pushed you too far; you’re going to overshoot the centerline.
The Fatal Mistake: Instead of steepening the bank (which is scary close to the ground), a student often tries to "pull" the nose around to the runway using inside rudder.
The "Skidding" Trap
When you use heavy rudder to force the nose to turn without enough bank, you are in a Skidding Turn.
The CFI Anecdote:
"I was with a student who was terrified of overshooting the runway at a tight airport. We were low, maybe 500 feet, and he realized he was going past the centerline. He kept the wings level-ish but stomped on that left rudder to point the nose at the numbers.
I felt the plane start to 'buffet'—that subtle shaking that tells you the wings are unhappy. I yelled, 'My controls!' and leveled us out immediately. I told him afterward: 'You were trying to steer it like a car on ice. When you skid that turn, the inside wing slows down significantly while the outside wing speeds up. You’re setting yourself up for a cross-control stall.'"
The Cross-Control Stall and Spin
This is why the Base-to-Final turn is so dangerous. If you stall the airplane while in a skid:
-
The inside wing (the one you're stepping on the rudder toward) stalls first.
-
Because it’s stalled, it drops violently.
-
The plane snaps into an incipient spin.
The CFI Wisdom:
"At 500 feet AGL (Above Ground Level), if you enter a spin, you don't have enough altitude to recover. The ground wins every time. I tell my students: 'If you overshoot the final, OVERSHOOT IT.' Just fly through the centerline, keep the turn coordinated, and gently fly back to it. Or, better yet, go around. There is zero shame in a go-around, but there’s a lot of paperwork and tragedy in a stall-spin accident."
How to Stay Safe: The "Square" Turn
To prevent this, CFIs teach the "Stabilized Approach."
-
Watch the Wind: Anticipate the wind drift on base so you can start your turn earlier.
-
Coordinate: Keep the ball in the center. If you need more turn, use more bank (up to 30 degrees), not more rudder.
-
Eyes Outside: Don't get "fixated" on the runway numbers. Keep your scan moving to check your airspeed and your coordination ball.
The "Bottom Rudder" Myth
Some old-timers talk about "kicking the nose around" with bottom rudder. In a modern flight school, we treat that as a "never-event" during the Base-to-Final turn.
The Final Word:
"I always tell my students: 'The rudder is for coordination, not for steering.' If you find yourself pushing the rudder to make the turn happen because you're afraid to bank the wings, your brain is telling you that the approach is unstabilized. Listen to your brain. Cram the power in, flaps to 20, and go around to try it again. The runway will still be there in five minutes."
"This article was generated using Gemini AI and then reviewed and edited by Lou DiVentura"
Flight Safety & Information Disclaimer
Notice: The technical information, diagrams, and "CFI-style" anecdotes provided in this blog are for educational and entertainment purposes only.
While these concepts are based on the FAA Airplane Flying Handbook and general Pilot’s Operating Handbooks (POH), every aircraft is unique. Airspeed V-speeds, weight and balance limits, and emergency procedures vary by specific make, model, and tail number.
Never use blog content as a substitute for official flight instruction or the FAA-approved POH located in your aircraft. As Pilot in Command (PIC), you are responsible for the safe operation of your aircraft in accordance with 14 CFR § 91.3
Write a comment